Placing Map Contents
In order to follow this tutorial, you need to have a map created by the 3D Scanner App, an application created through the Developer Console for your specific Team and have the map bound to your application using either the 3D Scanner App or the Developer Console.
We recommend reading through Getting Started first to make sure everything is setup properly.
Intro to Placing Contents
After successfully relocalizing your map, press the Content Authoring button. You will be presented with the application selection panel, asking you to choose an app from the list of currently bound applications.
Since one map can be used for multiple different applications, and each of them could have different types of content, it is necessary to choose both the application and the map for authoring content.
Select the application you wish to add content for and you are ready to use the content editing tools.
UI Overview
Below is the UI of the editing tools, taken from a screenshot of 3D Scanner App.
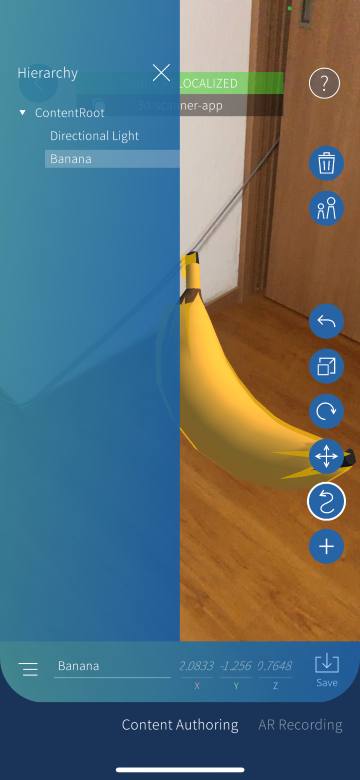
By pressing the Edit button on the bottom right, we can toggle the editing tools. On the bottom part of the UI, we can see several different tools to add and manipulate your object. On top of the manipulation tools, there is an input box that you can use to rename the object.
On the left of the name box, we can see the Hierarchy button. Pressing this button will toggle the visibility of the Hierarchy UI. This hierarchy will be kept when the map contents are imported to Unity Editor.
On the right side of the name box, we can see additional operations. From here we can parent/un-parent an object to another object, and delete the selected object. Finally on top of it we have the Savebutton. By pressing this button, the map contents will be saved.
These are some examples on how we can operate the editing tools to adjust the transform of an object.
Editing Operations
Add
We can start using the editing tools once we have relocalized the map successfully. To add an object, press the + button. By default, we provide some default Unity objects that you can add:
- Empty Node (Empty Game Object)
- Cube
- Sphere
- Directional Light
- Point Light
⚠️ Known Issue
When transitioning from
AR RecordingtoContent Authoringby clicking the footer menu, it will only showEmpty Nodewhen trying to add objects in theContent Authoringmode.If you came across this issue, please go back to the main menu and directly choose
Content Authoringafter successful relocalization to fix the issue.
Scale
We can scale an object with the scale tool. By manipulating the gizmos located in the center of the object, we can uniformly change the size.
Rotate
We can choose each individual axis to manipulate. In this case we select an axis and rotate.
Move
Similar to Unity transform gizmos, we can drag the object where we want them to be.
Delete
We can delete an object.
Undo
We can press the Undo button to cancel the last action you take.
Save
Once you are satisfied with the placements of the contents, you can press the Save button to save the map contents. By saving the map contents, you can download it into Unity Editor using Pretia SDK and imported as a prefab.
Next we will look into how we can add custom objects and place it inside a map.