Multiplayer Sample
This sample uses map-based relocalization for establishing a shared coordinate system in order to showcase how multiplayer experience can be implemented using Pretia AR Cloud. After successfully finding the shared anchor from a map, the sample will spawn a drone for each connected player. This drone will follow its owner's device, and the player can press a button to make the drone jump or shoot. The sample supports up to eight concurrent players.
Understanding the Scenes
For the multiplayer sample, Please open MultiplayerScene.
Scene Hierarchy
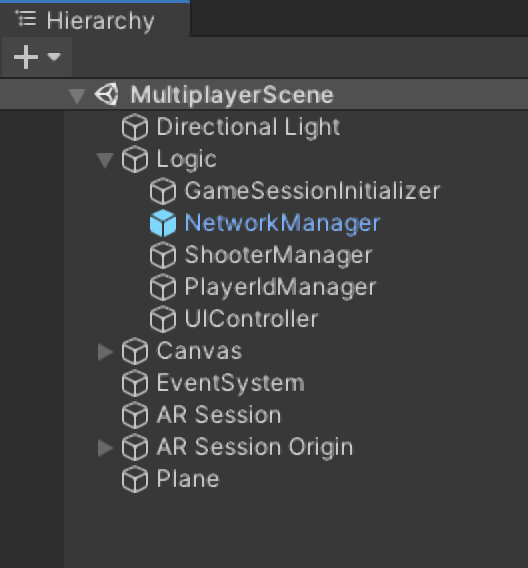
This scene contains all the components required for multiplayer implementation.
NetworkManager is a prefab which is provided by the SDK. This can simply be dragged-and-dropped into the scene. This prefab contains two important components, which are NetworkManagerComponent and RegisterNetworkPrefab.
NetworkManagerComponent
Within NetworkManagerComponent there is a Settings field which can be assigned with a NetworkSettings scriptable object. You can create a new NetworkSettings by right clicking the Project window, and select Create > Pretia ArCloud > Network > NetworkSettings.
Note: This component is a singleton monobehaviour, which means that when a new scene is loaded, this game object will stay in the scene.
RegisterNetworkPrefab
RegisterNetworkPrefab component is necessary for when you need to instantiate a prefab, and the instantiation needs to be synchronized to all connected players. In this case we need to attach a NetworkIdentity component to the prefab, and add it to the Prefabs list in this component. Once we have added the prefab to the list, we can use one of the NetworkSpawner.Instantiate methods to achieve synchronized instantiation.
Game Logic
Within the scene, we can see default Unity game objects like Directional Light, Canvas, and we can also see default game objects and components from AR Foundation. Within the AR Session Origin game object, there is the AR Shared Anchor Manager component which is required to use the relocalization feature of Pretia AR Cloud. All of these components have been explained in the relocalization sample documents. One thing to note is that we are using criteria-based map selection which means we need to have a map-key assigned to the app key we're using for this application. You can assign the map key from the developer console.
Let's take a look at GameSessionInitializer, ShooterManager, and PlayerIdManager instead, as these game objects contains all the components required for running the multiplayer features for this sample.
GameSessionInitializer
GameSessionInitializer is a MonoBehaviour script that will prepare and initializes a IGameSession instance. Most of the messaging and synchronization APIs are exposed from IGameSession, so it's a very important component of the multiplayer APIs. From this script, you can also see how to join existing public session, or create your own session.
ShooterManager
ShooterManager is a MonoBehaviour script that contains most of the logic of the gameplay. It attaches callback to connect the game session upon successful relocalization, initializes drone for each connected players, sets up the buttons for sending jump and shoot messages for each drone, and many other things. It would be good to spend some time understanding this script to get a better understanding of how the multiplayer features can be utilized.
PlayerIdManager
This component ensures that each connected players has a unique id value which is synchronized on all connected players. We do this by creating an array of uint?, and synchronizing it with the network snapshot feature of the networking APIs.
Network Snapshot will be sent as a message to a newly connected player, so we can use this feature to initialize important components. For the sample, each player has a drone, and each drone has different colors. To synchronize the colors of each drone, we utilize the network snapshot feature with this PlayerIdManager component.
Understanding the Multiplayer Features
This sample utilizes all of the multiplayer features that exists in the networking APIs to showcase how each of them can be used. As a general overview, we will be looking into Network Message, Network Spawner, Network Synchronization, and Network Snapshot.
Network Message
The networking APIs uses network message as the base of all multiplayer capabilities. Synchronization and snapshots are built on top of the network message. Network Message can be defined using a struct or a class, and by adding the NetworkMessage attribute and MessagePackObject attribute to it. Below is an example of a network message definition. There are four important parts, definition, registration/unregistration of the callback when we receive the message, and actually sending the message.
// NetworkShootMsg.cs

[NetworkMessage]
[MessagePackObject]
public struct NetworkShootMsg
{
}

// ShooterManager.cs

// Register the network message callback
private async void OnEnable()
{
    // ...

    // Use GetLatestSessionAsync() to easily get access to the IGameSession
    _gameSession = await NetworkManager.Instance.GetLatestSessionAsync();
    // Register the callback for NetworkShootMsg
    // In this case we're using PlayerMsg to broadcast the message to all the other connected players
    _gameSession.PlayerMsg.Register<NetworkShootMsg>(InvokeShootOnCharacter);

    // ...
}

// Unregister the network message callback
private async void OnDisable()
{
    // ...

    if (_gameSession != null)
    {
        // Don't forget to unregister the callback
        _gameSession.PlayerMsg.Unregister<NetworkShootMsg>(InvokeShootOnCharacter);
    }

    // ...
}

// The function callback definition
// This function is called whenever the client receives the NetworkShootMsg from the PlayerMsg protocol
private void InvokeShootOnCharacter(NetworkShootMsg msg, Player sender)
{
    // If the drone exists for the player
    if (_ownerToShooterMap.TryGetValue(sender, out ShooterFacade shooter))
    {
        // Execute the shoot animation
        shooter.AnimController.ShootAnimation();
    }
}

// This function is called whenever a player joins the game session, and the drone for the player has just been instantiated
private void SetupCharacter(NetworkIdentity networkIdentity)
{
    // ...

    // If the local player is the owner of the instantiated drone
    // Setup the shoot button to correspond to this drone
    if (networkIdentity.Owner == _gameSession.LocalPlayer)
    {
        // Add a callback to send a NetworkShootMsg with the PlayerMsg protocol whenever we press the shoot button
        _shootButton.onClick.AddListener(() => _gameSession.PlayerMsg.Send(new NetworkShootMsg()));
    }

    // ...
}
In the sample, we're using network message as a way to synchronize the drone shooting. When a player presses the shoot button, they will send a message to all the other connected players. This message will then be received by all the other players, and each of the devices will spawn a bullet and simulate the physics for shooting the ball. For the sample, we choose to simulate the physics locally on each of the devices, since we are already synchronizing the aim and shooting direction of the drone.
Network Spawner
NetworkSpawner is a feature to instantiate a prefab in all connected players. The APIs are similar to Unity's instantiation APIs, the only difference is that we need to supply the owner of the instantiated prefab.
// Network Instantiation APIs
public void Instantiate(NetworkIdentity prefab, Vector3 position, Quaternion rotation, Player owner);
public void Instantiate(NetworkIdentity prefab, Vector3 position, Quaternion rotation, NetworkIdentity parent, Player owner);
For the sample, we use this feature to instantiate the drone. The instantiation happens after the relocalization is successful, and the local camera proxy by the CameraNetworkManager component is ready.
private async void OnEnable()
{
    // Attach a callback to spawn the drone when the local camera proxy is ready
    // The local camera proxy will be ready once the game session is connected successfully,
    // and the network camera manager instantiates the local camera proxy
    // The sample will try to connect the game session once relocalization has finished successfully
    _networkCameraManager.OnLocalProxyReady += SpawnCharacter;

    // ...
}

// The function callback definition
// In this function we calculate the position in front of the device
// And instantiate the prefab with the NetworkSpawner.Instantiate method
private void SpawnCharacter(Transform localProxy)
{
    var spawnPosition = localProxy.position + (localProxy.forward * SPAWN_FORWARD_DISTANCE);
    spawnPosition.y = localProxy.position.y;

    _gameSession.NetworkSpawner.Instantiate(_characterPrefab, spawnPosition, Quaternion.identity, _gameSession.LocalPlayer);
}

private void OnDisable()
{
    // Don't forget to remove the callback on OnDisable
    _networkCameraManager.OnLocalProxyReady -= SpawnCharacter;

    // ...
}
Network Synchronization
We use Network Synchronization when we want to update the value of a certain component every time it changes. For the sample, we use this feature to synchronize the position and rotation of each drone, as well as the aim. Let's take a look at NetworkDrone.cs as an example of how to use this feature.
// In order to use the network synchronization feature,
// it's important to derive from the NetworkBehaviour class
public class NetworkDrone : NetworkBehaviour
{
    // Enable this flag to use the latest NetworkVariable feature for synchronization
    protected override bool NetSyncV2 => true;

    // Prepare the component dependency
    [SerializeField] private Rigidbody _rigidbody;

    // Define the network variables to synchronize
    // NetworkVariable lets us define synchronizable fields/properties in a more concise manner
    private NetworkVariable<Vector3> Pos;
    private NetworkVariable<float> RotY;

    [SerializeField] private Transform _barrel;
    private NetworkVariable<Quaternion> BarrelRot;

    // Initialize and set the initial value for the network variables
    private void Awake()
    {
        Pos = new NetworkVariable<Vector3>(_rigidbody.position);
        RotY = new NetworkVariable<float>(_rigidbody.rotation.eulerAngles.y);
        BarrelRot = new NetworkVariable<Quaternion>(_barrel.localRotation);
    }

    // SyncUpdate gets called every network tick.
    // This function is only called on the player that has authority over the game object.
    // In this function, we update the network variables with their updated values.
    protected override void SyncUpdate(int tick)
    {
        Pos.Value = _rigidbody.position;
        RotY.Value = _rigidbody.rotation.eulerAngles.y;
        BarrelRot.Value = _barrel.localRotation;
    }

    // SerializeNetworkVars gets called every network tick, before sending the synchronization updates.
    // In this function, we should call the Write function for each network variables we want to synchronize
    protected override void SerializeNetworkVars(ref NetworkVariableWriter writer)
    {
        writer.Write(Pos);
        writer.Write(RotY);
        writer.Write(BarrelRot);
    }

    // DeserializeNetworkVars gets called after receiving the synchronization updates.
    // In this function, we should call the Read function for each network variables.
    // Make sure that the reads are in the same order as the writes
    protected override void DeserializeNetworkVars(ref NetworkVariableReader reader)
    {
        reader.Read(Pos);
        reader.Read(RotY);
        reader.Read(BarrelRot);
    }

    // ApplySyncUpdate gets called immediately after deserializing the received synchronization updates.
    // In this function, we should apply the updated values to their corresponding components
    protected override void ApplySyncUpdate(int tick)
    {
        _rigidbody.position = Pos.Value;
        _rigidbody.rotation = Quaternion.Euler(_rigidbody.rotation.eulerAngles.x, RotY.Value, _rigidbody.rotation.eulerAngles.z);
        _barrel.localRotation = BarrelRot.Value;
    }
}
Other than for synchronizing the drone, the sample also utilize this feature to synchronize the pose of all connected devices. This is done using the
NetworkCameraManagercomponent attached to theAR Cameragame object. TheNetworkCameraManagercomponent is a script provided by the SDK to easily synchronize all connected devices' pose.
Network Snapshot
We have mentioned slightly in this tutorial about network snapshots. Network Snapshot is a feature for synchronizing the initial state of newly connected players. When a player joins a game session, they need to initialize their state by requesting a snapshot of the current game session to the host. The host receives this request, and sends the latest snapshot of the session to the new player. The player receives the snapshot and apply it so that they can synchronize their initial state. Let's take a look at the PlayerIdManager implementation as an example of how to use this feature.
// Define a network message to use for the snapshot
[NetworkMessage]
[MessagePackObject]
public class PlayerIdSnapshotMsg
{
    [Key(0)]
    public uint?[] UserNumbers;
}

// Derive from the ISnapshot interface
public class PlayerIdManager : MonoBehaviour, ISnapshot
{
    // ...

    // Register the callback when the host receives a snapshot request
    public void RegisterSnapshotCallback(HostToPlayerMessageHandler hostToPlayerMsg)
    {
        hostToPlayerMsg.Register<PlayerIdSnapshotMsg>(SetupUserNumbers);
    }

    // Enqueue a network message containing the snapshot values
    public void EnqueueSnapshot(HostToPlayerMessageHandler hostToPlayerMsg)
    {
        hostToPlayerMsg.Enqueue(new PlayerIdSnapshotMsg { UserNumbers = _userNumbers });
    }

    // The function callback definition. In this case we update the variable value and find the next id we can use.
    private void SetupUserNumbers(PlayerIdSnapshotMsg msg)
    {
        _userNumbers = msg.UserNumbers;
        _nextUsedId = FindNextUsedId();
    }

    // ...
}
Building the Sample
Make sure that MultiplayerScene is added to the build settings.
There are some settings we need to do before we can build our application. Please refer to this guide on how to build your application.
Running the Sample
Run the sample on a device, press the start button and relocalize the area of the map key assigned to your application. Once the relocalization is successful, you should see a drone in front of your camera. This drone is your character, and it should follow wherever you move your device, and you can also control the drone to shoot and jump.
Running the sample with one device won't really showcase much of the multiplayer features, so try to run the sample on another device, or alternatively run the sample from Unity Editor. If using Unity Editor, you should be able to join the game without having to relocalize, and you can control the camera by using a mouse to simulate device movements.