Getting Started
Before starting, make sure that you are already registered as a developer from the Developer Portal, and you already have an app created with your account. This is required because we will need the application key to make use of the Networking SDK.
General Flow
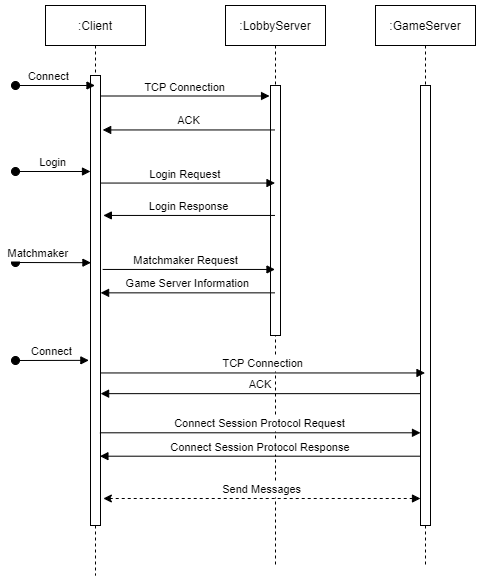
It is important to understand that in order to connect to a Game Server, you first need to connect, login, and make a request to get an access token to the Lobby Server. The Matchmaker will handle the match-making, and will send the Game Server IP address and port to the requested client. This information will then be used by the client to make a connection to the Game Server. After which you can start sending and receiving messages and make a multiplayer experience.
It might seem slightly complicated, but the SDK already handles most of it.
using PretiaArCloud.Networking;
using UnityEngine;

public class NetworkWrapper : MonoBehaviour
{
  private async void Start()
  {
    // NetworkManagerComponent is provided by the SDK.
    NetworkManager networkManager = NetworkManager.Instance;
    Matchmaker matchmaker = Matchmaker.Instance;

    // NetworkManager.ConnectAsync will establish a TCP connection to the Lobby Server.
    bool networkInitialized = await networkManager.ConnectAsync();
    if (!networkInitialized) throw new System.Exception();

    // NetworkManager.LoginAsync will make a login request to the Lobby Server.
    // Keep in mind that this will be a different account than what you've used to login to the developer portal.
    var guest = "guestName";
    (NetworkStatusCode loginResult, byte[] token, string displayName) = await networkManager.GuestLoginAsync(guest);

    // Check the login result, and request a match if succeeded.
    if (loginResult == NetworkStatusCode.Success)
      {
        var sessionName = "session-name";
        var labels = new Dictionary<string, string>();
        labels.Add("my-key", "my-value");

        // Create a new session
        var (sessionInfo, ipEndPoint) = Matchmaker.Instance.CreateSessionAsync(token, sessionName, priv: false, labels);

        // Connect to the game session
        // IGameSession is the main interface that will be used for sending/receiving messages.
        IGameSession gameSession = await networkManager.CreateGameSessionAsync(ipEndPoint, token);

        // IGameSession.ConnectSessionAsync will send a Connect Session Protocol Request to the Game Server.
        // This is required before you can start sending/receiving messages.
        // Take note that this is the IGameSession instance making a connection, not the NetworkManager.
        // If you need to get this instance from another script, you can access it by:
        // var gameSession = await NetworkManager.Instance.GetLatestSessionAsync();
        gameSession.ConnectSessionAsync();

        // Wait until the GameSession is connected.
        bool gameSessionConnected = await gameSession.WaitForConnectionAsync();

        // You can now start sending messages!
      }
  }
}
Scene Setup
Project Settings
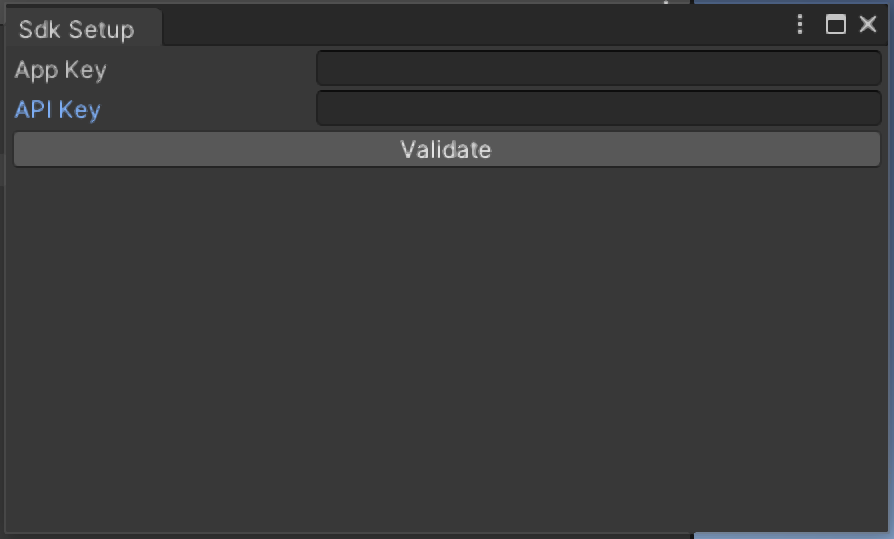
In order to use some features of Pretia AR Cloud such as cloud relocalization and multiplayer, it is necessary to setup an application on the DevPortal, and enter the application key to the Editor. Open the SDK Setup Window by clicking the Menu Pretia > Sdk Setup. It will open the Sdk Setup window and you can enter it on the App Key field.
NetworkManager Prefab
Find the NetworkManager prefab in the Project tab, and drag it to the scene.
Package > Pretia SDK > Prefabs > NetworkManager
Note: The NetworkManager prefab will be a singleton and will persist even when changing scenes.